
TL;DR
A closet can work well as a recording or streaming booth if you focus on placement, reflection control, and proper ventilation. Acoustic foam helps inside, but sealing gaps and managing low-frequency buildup are just as crucial. Moving the rig elsewhere is the simplest solution for noise issues.
Ever wondered if a closet could be your new recording studio? The truth is, it can — if you approach it with the right mindset. Most people jump straight to foam panels, thinking they’ll turn a tiny space into a soundproof sanctuary. But the real magic lies in how you place equipment and handle airflow.
This guide breaks down exactly how to make a closet work for your voice-over, podcasting, or streaming setup. You’ll learn the secrets of placement, dampening, and ventilation to get clear, echo-free sound — without turning your closet into a noisy furnace.
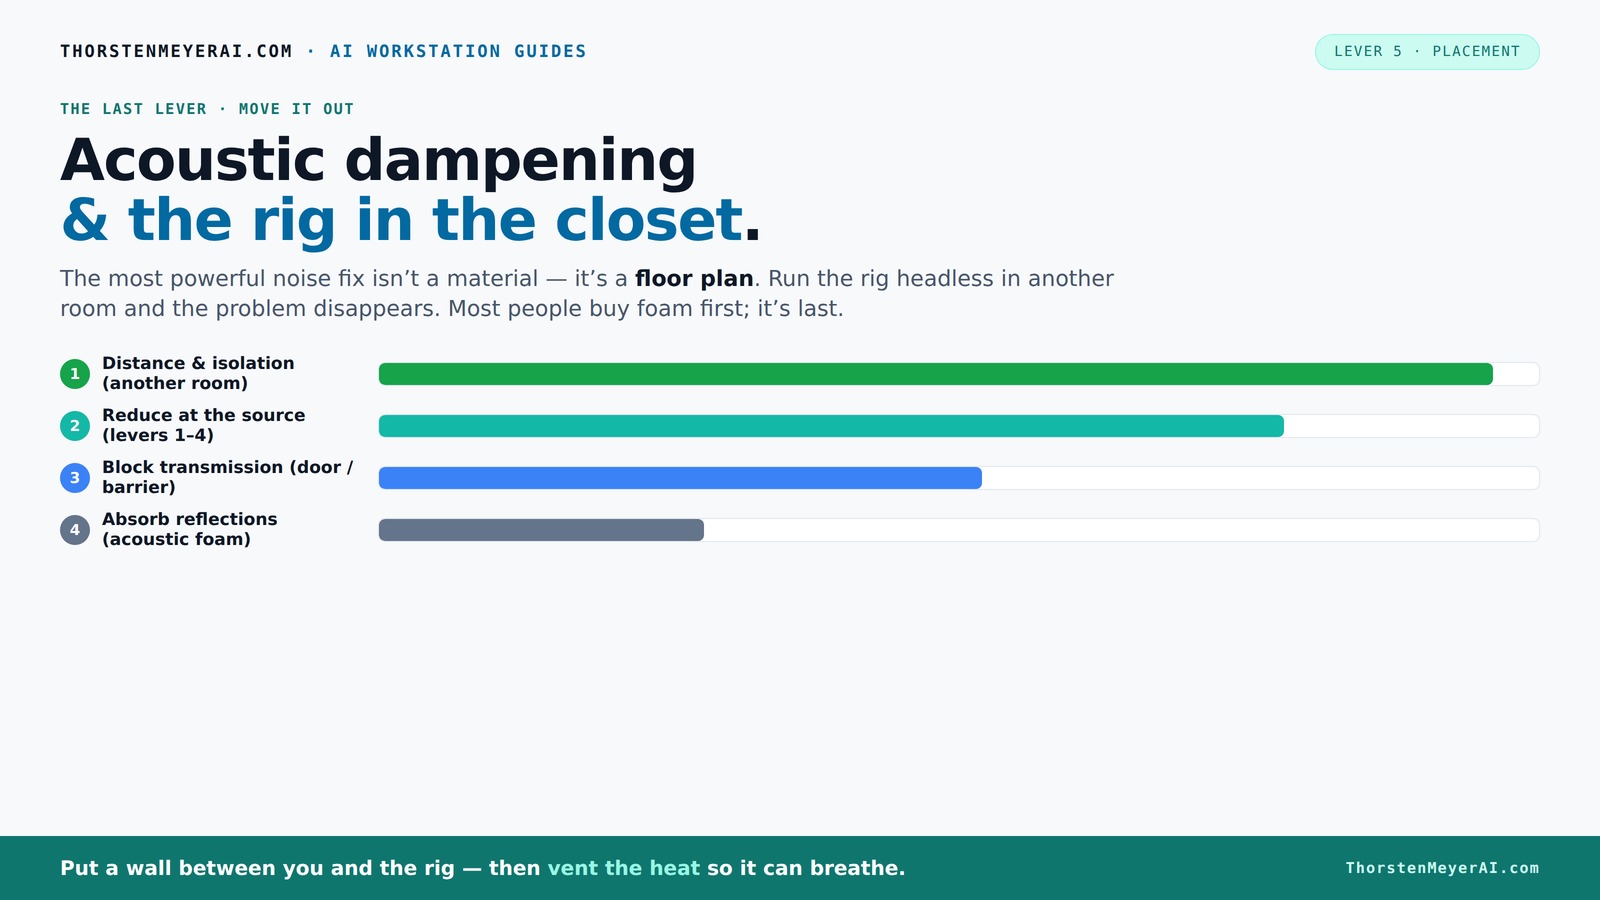
Acoustic dampening
& the rig in the closet.
The most powerful noise fix isn’t a material — it’s a floor plan. A rig you can’t hear because it’s in another room beats any amount of foam. Tap the approaches in Part 1 to see what actually works.
(another room)
(levers 1–4)
(door / barrier)
(acoustic foam)
Contain the noise, not the heat
Key Takeaways
- Moving your rig into another room or closet is the most effective way to cut noise — it’s better than any foam panel or barrier.
- Acoustic foam absorbs reflections but doesn’t block sound from leaving; sealing gaps and handling low frequencies are equally important.
- Place your mic at a proper distance from reflective surfaces, aiming for the first reflection points, to keep your sound natural and clear.
- Ventilation is non-negotiable: active airflow prevents overheating and loud fans in a closet setup.
- Hybrid treatment — blankets, foam, and bass traps — offers the best balance for tiny spaces.

24 Pack Black 12 x 12 x 2 Inches Pyramid Designed Acoustic Foam Panels, Sound Proof Foam Panels for Walls, High Density and Flame-Retardant Acoustic Panels, Sound Panels for Recording and Home Studio
Exceptional Sound Absorption:These pyramid acoustic panels are engineered to effectively absorb sound waves, reducing echo and reverberation. With...
As an affiliate, we earn on qualifying purchases.
As an affiliate, we earn on qualifying purchases.
Why a closet can be your secret weapon for sound quality
First off, a closet's small size actually helps your sound. With less space for sound to bounce around, you get fewer echoes and a more direct sound. But it’s not just about size — how you treat the surfaces and position your mic makes all the difference.
Imagine a closet filled with clothes, blankets, and foam — it’s like creating a mini-vocal booth. But don’t forget, soundproofing and dampening aren’t the same. Foam absorbs reflections, but it doesn’t block noise from leaking out or in. That’s where placement and sealing gaps come in.
Think of it like a tiny concert hall. You want to control the reflections without turning the space into a muddy, dead zone. The goal: clear, natural sound that doesn’t bounce back or escape to bother neighbors.

Audimute Soundproofing Acoustic Door Seal Kit - Door Sweep and Seal - (Large Size)
Includes (2) Door Seals (3/16" x 1/2" x 50') and (1) Door Sweep (1/2" x 1.5" x 25').
As an affiliate, we earn on qualifying purchases.
As an affiliate, we earn on qualifying purchases.
How to position your mic and gear for the best sound inside a closet
Where you put your mic matters more than you think. The best spot? Place it about 6-12 inches from a treated wall behind it, aiming at your mouth. This minimizes reflections bouncing into the mic and keeps your voice clear.
Pro tip: Use the 3-to-1 rule — keep the mic three times as far from reflective surfaces as it is from your mouth. For example, if your mic is 6 inches from your lips, it should be at least 18 inches from reflective walls or the ceiling.
Example: If you’re recording vocals, set your mic at head level, with foam panels behind and to the sides at reflection points. Add a pop filter and try different angles until your voice sounds warm and direct, free of echo.

Sound Addicted - Studio Monitor Isolation Pads for 5 Inch Monitors, Pair of Two High Density Acoustic Foam which Fits Most Speaker Stands | SMPad 5
SMPad 5 is made out of the highest quality acoustical foam (50kg/m^3 density).
As an affiliate, we earn on qualifying purchases.
As an affiliate, we earn on qualifying purchases.
Treat the surfaces that cause reflections — what to focus on first
In a tiny closet, most reflections come from the walls, ceiling, and door. For tips on optimizing your setup, check out acoustic dampening. Start by treating the surface directly facing the mic, usually the back wall. Use foam or blankets to absorb sound waves and prevent flutter echo.
Next, address the side walls at the first reflection points. You can find these spots by doing a quick flashlight test — hold the light behind your mic while speaking, and mark where the light hits the walls. Cover those spots with foam, blankets, or panels.
Don’t forget the ceiling! In a small space, overhead reflections can muddy your sound. Hang a thick blanket or acoustic panel above your head. If the door is reflective, seal it with weatherstripping or hang an acoustic curtain.
Why is this important? Because each of these surfaces influences the clarity and warmth of your recording. Properly treating the main reflection points reduces echo and ensures your voice is captured cleanly, making your recordings sound professional even in a tiny space. You can learn more about acoustic treatment here. Overlooking these areas can lead to muddiness, making your voice sound distant or boomy, which is harder to correct later.

TroyStudio Portable Vocal Booth, Large Foldable Microphone Isolation Shield, Music Recording Studio Sound Echo Absorbing Box, Desk & Stand Use Reflection Filter with Thickened Dense Acoustic Foam
【BASIC INFO】: Inside size after setup: 8'' (L) X 10'' (W) X 12'' (H), large space for various...
As an affiliate, we earn on qualifying purchases.
As an affiliate, we earn on qualifying purchases.
Foam, blankets, or a mix? Choosing the right dampening materials
Acoustic foam is designed to absorb high frequencies and reduce echo. It’s lightweight, easy to install, and looks tidy. But in a closet, blankets and moving padding can be just as effective, especially for broader absorption.
Think of foam as fine-tuning treble, while blankets are more like thick wool sweaters that soak up everything. Combining both often yields the best result — foam for targeted reflection points, blankets for broad damping.
Real-world tip: Cover the closet walls with moving blankets, then add foam panels at critical reflection spots. This hybrid approach balances absorption and practicality, creating a cozy yet controlled recording space. The tradeoff? Using blankets can reduce the overall brightness of your sound slightly, so you might need to adjust your EQ afterward. But the added absorption often outweighs this minor downside, especially in small, echo-prone spaces.
Seal gaps and leaks — the overlooked step to quiet your closet
Sound leaks through gaps, cracks, and unsealed doors. In a closet, tiny openings can sabotage your efforts. Use weatherstripping around the door frame and seal any cracks with acoustic sealant or foam strips.
Example: If your closet door is a solid wood or hard surface, hang a heavy blanket or acoustic curtain over it. This not only absorbs reflections but also prevents sound from escaping.
Why does this matter? Because even tiny gaps can let in street noise, household chatter, or spill over to your neighbors. Sealing these leaks creates a much more controlled environment, allowing your recordings to sound cleaner and more professional. For more tips, visit gold-ira-rollovers.org. It’s a simple step that often yields a surprisingly noticeable difference in noise levels—think of it as closing the door on outside distractions.
Handling low-frequency buildup — do you need bass traps?
Low-frequency sound waves are the sneakiest. To learn how to manage them, see bass trapping techniques. In small, parallel rooms like closets, they can create standing waves and bass boominess. To tame this, add bass traps in the upper corners where low-end energy tends to collect.
For a tiny closet, a few thick foam bass traps or DIY solutions like rolled-up blankets in corners can cut rumble and make your recordings clearer. Why does this matter? Because low frequencies tend to resonate and amplify in small, enclosed spaces, which can muddy your recordings and make voices sound boomy or muffled. Addressing bass buildup isn’t just about reducing rumble — it’s about achieving a balanced, natural sound that accurately represents your voice or instrument. Without proper low-end control, even the best mid and high-frequency treatments won’t prevent your recordings from sounding dull or boomy. Think of bass traps as the foundation of a good acoustic environment; neglecting them can compromise the entire sound quality.
Ventilation and airflow: keeping your rig cool without noise
Putting a high-powered rig in a closet means managing heat and noise at once. You can’t just seal it up — trapped heat kills your components and makes fans scream.
Use active ventilation: install a quiet exhaust fan with ducting to direct hot air outside. Pair it with a passive vent or grille to allow fresh air in.
Example: A streamer mounted a small fan in a vented panel, ducting hot air outside. It kept the room cool and noise low — perfect for long sessions. Check out [this guide](https://thorstenmeyerai.com/reduce-heat-noise-ai-workstation/) for more cooling tips.
Why is this important? Because overheating can cause your equipment to throttle, which reduces performance and can lead to hardware failure over time. Additionally, fans generate noise, which defeats the purpose of quieting your space. Proper ventilation ensures your gear stays cool without adding unwanted background noise, maintaining audio clarity during long recordings or streams.
The "rig in the closet" setup — the ultimate noise solution with a catch
Putting your GPU or AI rig inside a closet is a game-changer for noise. It isolates the sound and keeps your workspace silent. But there’s a big caveat: heat buildup.
If you seal a hot, busy machine inside a closet without airflow, it’ll overheat. Fans will roar, and your components will throttle. To prevent this, add active ventilation and possibly a ducted exhaust system.
Pro tip: Use a purpose-built soundproof cabinet or ventilation setup that combines acoustic treatment with heat dissipation. This way, you get quiet and cool — the best of both worlds.
Why does this matter? Because without proper airflow, your rig can overheat, leading to thermal throttling, reduced performance, or even hardware failure. Properly ventilated enclosures or ducted systems are essential to maintain both silence and safe operating temperatures. This tradeoff between noise reduction and heat management is critical to ensure your setup is both effective and reliable.
Frequently Asked Questions
Is a closet good enough for voice-over or vocals?
Absolutely, if you treat the surfaces properly and control reflections. Small closets can produce warm, direct sound, especially with absorption behind the mic and at reflection points. Just remember, sealing gaps and managing low frequencies makes a big difference.
Do I need acoustic foam, moving blankets, or both?
Both work well together. Foam panels target high frequencies and echo, while blankets or thick padding absorb broader reflections and reduce room resonance. Combining them offers a balanced, effective solution.
Where should I place the mic in a closet booth?
Position the mic about 6-12 inches from your mouth, aiming at the treated wall behind you. Use the 3-to-1 rule to avoid reflections, and experiment with angles for the clearest sound.
Should I treat the walls, ceiling, or door first?
Start with the wall directly behind your mic, then move to side walls at reflection points. Don’t forget the ceiling, especially in tiny spaces. Seal the door gaps last for maximum noise reduction.
How much coverage is enough in a small closet?
More coverage beats perfect placement. Cover walls, ceiling, and door with blankets or foam. In small rooms, a ‘layered’ approach works best — the more, the better, as long as it’s practical.
Conclusion
In the end, the best closet setup isn’t just about throwing in foam. It’s about thoughtful placement, sealing leaks, managing low-end, and ensuring airflow. Your closet can become a quiet, cozy corner for voice or video — if you treat it like a mini studio, not just a storage space.
Imagine a tiny, soundproofed booth with perfect clarity and zero noise bleed. That’s achievable — and sometimes, the simplest fix is just moving your machine away from your desk.